By default, traffic in a PowerShell Remoting session is encrypted no matter whether HTTP (TCP/5985) or HTTPS (TCP/5986) transport protocol is used. Anyway, all traffic is encrypted using AES-256 key. However, if you connect to a remote computer outside your AD forest or in a workgroup (Kerberos cannot establish a trust relationship with), you are at risk of man-in-the-middle attacks. Microsoft recommends always using HTTPS transport for PSRemoting when you connect to third-party computers.
In this article, we’ll show how to configure PowerShell Remoting over HTTPS using an SSL certificate. PSRemoting sessions over HTTPS provide a higher session security level when connecting to computers outside of your AD domain/forest.
The steps below describe how to configure a remote device running Windows you want to connect to using PowerShell Remoting over HTTPS.
Make sure that your network location in Windows is set to Private or Domain:
Get-NetConnectionProfile
Enable WinRM and PSRemoting using the command:
Enable-PSRemoting -Force
To configure HTTPS for WinRM, you first need to create an SSL certificate on a computer you want to connect to. The certificate will be used to encrypt WinRM traffic. It is easier to create a self-signed certificate using PowerShell. In a domain environment, you can issue WinRM certificates automatically using Auto-Enrollment.
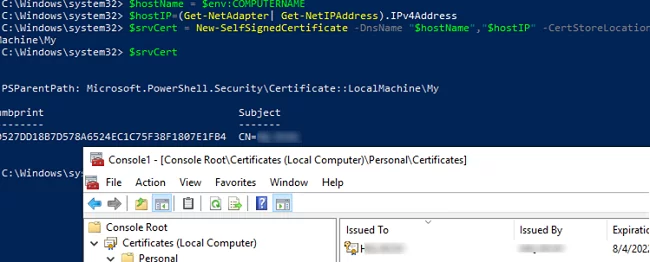
Specify the computer name and its IP address as the DNS name of the certificate (it is convenient if your network doesn’t have a DNS server). You can get both values for the Subject Alternative Name of the certificate and generate a self-signed certificate with PowerShell:
$hostName = $env:COMPUTERNAME
 $hostIP=(Get-NetAdapter| Get-NetIPAddress).IPv4Address|Out-String
 $srvCert = New-SelfSignedCertificate -DnsName $hostName,$hostIP -CertStoreLocation Cert:\LocalMachine\My
 $srvCert
The new SSL certificate will appear in the personal certificate store on the computer.
By default, two listeners on different ports are created for PowerShell Remoting in Windows:
- HTTP on Port 5985
- HTTPS on Port 5986
You can get a list of active WSMan listeners as shown below:
Get-ChildItem wsman:\localhost\Listener
Remove default HTTP and HTTPS listeners:
Get-ChildItem wsman:\localhost\Listener\ | Where-Object -Property Keys -like 'Transport=HTTP*' | Remove-Item -Recurse
Create a new HTTPS listener and bind your certificate to it:
New-Item -Path WSMan:\localhost\Listener\ -Transport HTTPS -Address * -CertificateThumbPrint $srvCert.Thumbprint -Force

Create a Windows Firewall rule that allows WinRM HTTPS traffic or make sure that it is active:
New-NetFirewallRule -Displayname 'WinRM - Powershell remoting HTTPS-In' -Name 'WinRM - Powershell remoting HTTPS-In' -Profile Any -LocalPort 5986 -Protocol TCP
Restart the WinRM service:
Restart-Service WinRM
You can check which certificate thumbprint a WinRM HTTPS listener is bound to using this command:
WinRM e winrm/config/listener
The remote host is configured. Now you have to export the SSL certificate to a CER file:
Export-Certificate -Cert $srvCert -FilePath c:\PS\SSL_PS_Remoting.cer
dir WSMan:\localhost\Service | ? Name -eq AllowUnencrypted
 dir WSMan:\localhost\Client | ? Name -eq AllowUnencrypted
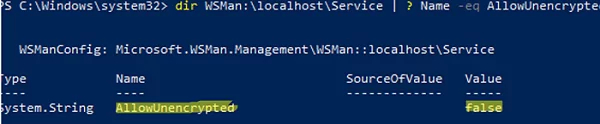
If necessary, you can disable unencrypted connections as follows:
winrm set winrm/config/service '@{AllowUnencrypted="false"}'‘
winrm set winrm/config/client '@{AllowUnencrypted="false"}
Copy the CER file to the admin computer and import it using the command below (or deploy the certificate to other computers using GPO):
Import-Certificate -FilePath c:\PS\SSL_PS_Remoting.cer -CertStoreLocation Cert:\LocalMachine\root\
Then, to connect to a remote Windows host using WinRM HTTPS, you must use the -UseSSL argument in the Enter-PSSession and Invoke-Command cmdlets. In the following example, we’ll connect to a remote host from the PowerShell console by its IP address (note that we haven’t added this IP address to TrustedHosts):
$SessionOption = New-PSSessionOption -SkipCNCheck
 Enter-PSSession -Computername 192.168.13.4 -UseSSL -Credential maxbak -SessionOption $SessionOption

The SSL certificate contains a common name (CN) that does not match the hostname.
4 comments
Immensely useful and simple to follow, thank you for this!
Bonjour.
The procedure works like a charm. Many many thanks
One question, however…
I’m in a Workgroup (home network)
My remote PC is a Surface Book running Windows 10 latest version (as today).
I’m the admin of the Surface and I connect to it either by face recognition (is it the right term?) or using a PIN code.
On the Surface, Windows is linked to a Microsoft account.
I was not able to follow the procedure above and to connect remotely until I created, for testing purpose only, a new local account with admin rights a name and a password.
Then, and only then I was able to connect to the Surface using his name and password.
So, the one million $ question is: which parameters should be used in the Enter-PSSession line when the admin of the remote station use a Microsoft account and a code PIN. I believe the question will come more and more often as Microsoft request a Microsoft account and an PIN code when installing latest versions of Windows.
I tried many things : email address, the 5 letters Id returned by whoami, the machine_name\5lettersId… and the PIN code but nothing worked.
Any help will be more than welcome
Regards, 40tude
Try the following:
Enter-PSSession -ComputerName Server1 -Credential MicrosoftAccount\[email protected]Is it safe to be open for all HTTPS connections from all IP addresses? Is it true that If another party does not have the particular CER imported in their system, they won’t be able to connect anyway?