You can configure network port forwarding in all Windows versions without using third-party tools. Using a port forwarding rule, you can redirect an incoming TCP connection (IPv4 or IPv6) from a local TCP port to any other port number, or even to a port on a remote computer. Windows port forwarding is most commonly used to bypass firewalls or to hide an internal host or service from the external network (NAT/PAT).
In the Linux world, port forwarding is configured quite simply using iptables or firewalldrules. On Windows Server hosts, the Routing and Remote Access Service (RRAS) is typically used to configure port redirections. However, there is an easier way to enable port forwarding using netsh portproxy mode, which works on all versions of Windows from Win XP to current builds of Windows 11 and Windows Server 2022.
How to Enable Port Forwarding on Windows with Netsh Portproxy?
You can configure port forwarding in Windows using the Portproxy mode of the Netsh command.
The command syntax is as follows:
netsh interface portproxy add v4tov4 listenaddress=localaddress listenport=localport connectaddress=destaddress connectport=destport
where
- listenaddress –is a local IP address to listen for incoming connection (useful if you have multiple NICs in different subnets/VLANs or multiple IP addresses on one interface);
- listenport – a local TCP port number to listen on (the connection is waiting on);
- connectaddress – is a local or remote IP address (or DNS name) to which you want to redirect the incoming connection;
- connectport – is a TCP port to which the connection from
listenportis forwarded to.
netsh interface portproxy add v4tov6/v6tov4/v6tov6 options, you can create port forwarding rules between IPv4 and IPv6 addresses.Let’s suppose your task is to make the RDP service respond on a non-standard port, for example 3340 (of course, this port number can be changed in the Windows settings, but we are using RDP to make it easier to demonstrate the port forwarding technique). To do this, we need to redirect incoming traffic from TCP port 3340 to another local port 3389 (this is the default RDP port number).
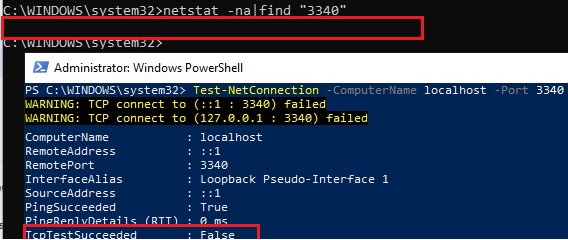
netstat -na|find "3340"
Alternatively, you can check that the port is not listening locally using the PowerShell cmdlet Test-NetConnection:
Test-NetConnection -ComputerName localhost -Port 3340
To create a port forwarding rule on Windows, open a command prompt as an administrator and run the following command:
netsh interface portproxy add v4tov4 listenport=3340 listenaddress=10.1.1.110 connectport=3389 connectaddress=10.1.1.110
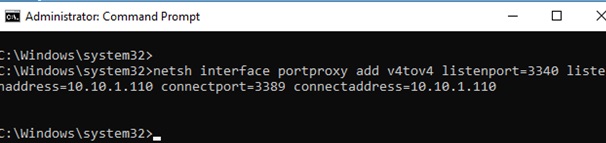
Where 10.10.1.110 – the current IP address of your computer on which port forwarding is configured.
Now, use the netstat tool to check that Windows is now listening on local port 3340:
netstat -ano | findstr :3340

Check the status of the service in the services.msc console or using the PowerShell command:
Get-Service iphlpsvc
![]()
IPv6 support must be enabled on the network interface for which the port forwarding rule is being created.
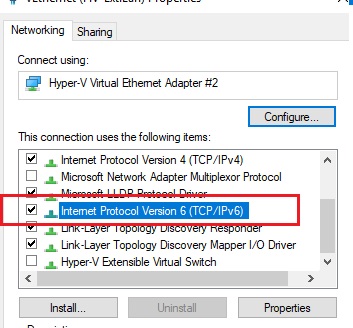
These are the prerequisites for the correct operation of port forwarding in Windows. Without the IP Helper service and without IPv6 support enabled, the port redirection won’t work.
To make port forwarding work on Windows Server 2003/XP, you must additionally set the IPEnableRouter parameter to 1 under the registry key HKEY_LOCAL_MACHINE\ System\CurrentControlSet\services\Tcpip\Parameter.
Set-ItemProperty -Path HKLM:\system\CurrentControlSet\services\Tcpip\Parameters -Name IpEnableRouter -Value 1
This option also allows you to enable routing between different subnets in Hyper-V.
You can identify the process that is listening on the specified port by its PID (in our example, the PID is 636):
tasklist | findstr 636
Now try to connect to the new port from a remote computer using any RDP client. You need to specify 3340 as the RDP port number. It is specified after the colon following the RDP host address. For example, 10.10.1.110:3340
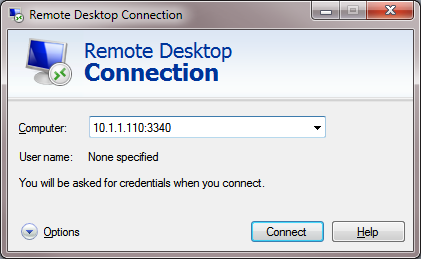
The RDP connection should be established successfully.
Portproxy port forwarding rules are permanent and are not cleared when you restart Windows. These rules are stored in the registry. You can list the netsh forwarding rules in the registry using PowerShell:
Get-ItemProperty -Path HKLM:\SYSTEM\CurrentControlSet\Services\PortProxy\v4tov4\tcp

If you want to forward an incoming TCP connection to a remote computer, use the following command:
netsh interface portproxy add v4tov4 listenport=3389 listenaddress=0.0.0.0 connectport=3389 connectaddress=192.168.100.101
This rule will redirect all incoming RDP traffic (from local TCP port 3389) from this computer to a remote host with an IP address 192.168.1.100.
Note that the portproxy mode in Windows doesn’t support saving the source IP in a forwarded network packet. Those, if you forward port 443 port from a Windows device to an internal web server, then all incoming connections will appear on the target server as coming from the same IP address (from your Windows host with netsh portproxy enabled). If you need to use source IP forwarding, you need to use NAT on an external firewall or on Hyper-V (described below).
Configuring Firewall Rules for Port Forwarding Mode in Windows
Ensure that your firewall (Microsoft Windows Defender or a third-party firewall, which is often part of the anti-virus software) allows incoming connections to the new port. You can add a new allow rule to Windows Defender Firewall with the command:
netsh advfirewall firewall add rule name="forwarded_RDPport_3340" protocol=TCP dir=in localip=10.1.1.110 localport=3340 action=allow
Or using the New-NetFirewallRule PowerShell cmdlet:
New-NetFirewallRule -DisplayName "forwarder_RDP_3340" -Direction Inbound -Protocol TCP –LocalPort 3340 -Action Allow
When creating an inbound firewall rule for TCP/3340 port via Windows Defender Firewall graphical interface, you don’t need to associate a program or process with the rule. This port is only listened on by the network driver.
If you disable the portproxy rule, be sure to remove the remaining firewall rule as follows:
netsh advfirewall firewall del rule name="RDP_3340"
or remove firewall rule with PowerShell:
Remove-NetFirewallRule -Name RDP_3340
Managing Netsh Port Forwarding Rules in Windows
You can create any number of port forwarding rules in Windows. All netsh interface portproxy rules are persistent and remain after a Windows restart.
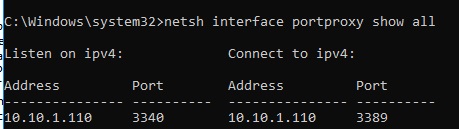
To display a list of all enabled TCP port forwarding rules on Windows, run the command:
netsh interface portproxy show all
In our case, there is only one forwarding rule from local port 3340 to 3389:
Listen on ipv4:             Connect to ipv4:
Address         Port        Address         Port
--------------- ----------  --------------- ----------
10.1.1.110     3340        10.1.1.110     3389
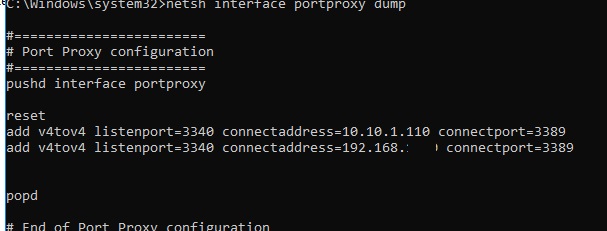
netsh interface portproxy dump
#========================
# Port Proxy configuration
#========================
pushd interface portproxy
reset
add v4tov4 listenport=3340 connectaddress=10.1.1.110 connectport=3389
popd
# End of Port Proxy configuration
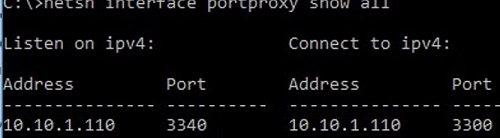
If you need to change the settings of an existing portproxy rule, use the following command:
netsh interface portproxy set v4tov4 listenport=3340 listenaddress=10.10.1.110 connectport=3300 connectaddress=10.10.1.110
In this example, we have changed the portproxy target port number to 3300.
To remove a specific port forwarding rule:
netsh interface portproxy delete v4tov4 listenport=3340 listenaddress=10.1.1.110
To remove all existing port mapping rules and completely clear the port forwarding rules table:
netsh interface portproxy reset
connectaddress.You can use Windows Server with the RRAS (Routing and Remote Access Service and NAT) role installed to enable port forwarding for UDP traffic. You can configure port forwarding between server network interfaces using the graphical snap-in (rrasmgmt.msc) or with the command:
netsh routing ip nat add portmapping Ethernet1 udp 0.0.0.0 53 192.168.100.100 53
The list of NAT port forwarding rules in Windows Server can be listed as follows:
netsh routing ip nat show interface
If you have WSL (Windows Subsystem for Linux) installed on your computer, you can create a simple PowerShell script to create a port forwarding rule to the WSL 2 virtual machine (a WSL2 VM has its own virtual ethernet adapter with a unique IP address):
wsl --shutdown;
 netsh interface portproxy reset;
 $wsl_ipaddr = wsl -d Ubuntu-20.04 hostname -I;
 netsh interface portproxy add v4tov4 listenport=443 listenaddress=0.0.0.0 connectport=443 connectaddress=$wsl_ipaddr ;
 netsh interface portproxy show all;
 exit;
Another implicit feature of portproxy is the ability to make any remote network service look like it runs locally. For example, you want to forward the connections from local port 9090 to a remote HTTPS server (google.com:443)
netsh interface portproxy add v4tov4 listenport=9090 connectport=443 connectaddress=google.com protocol=tcp
Now, the Google search page will open if you go to http://localhost:9090/ in your browser (you need to ignore SSL_ERROR_BAD_CERT_DOMAIN errors). So despite the browser accessing the local computer address, it opens a page from an external web server.

Windows cannot forward a range of TCP ports. If you need to forward multiple ports, you will have to manually create multiple portproxy redirecting rules.
Port forwarding rules can also be used to redirect a port from the external IP address of a physical NIC to a port of a virtual machine running on the same host. In Hyper-V, you can configure port forwarding on a Virtual Switch level (see below).
Port Forwarding with NAT Rules on Hyper-V Virtual Switch
When using the Hyper-V role on your computer (it can be installed on both Windows 10/11 and Windows Server, or as a free Hyper-V Server), you can configure DNAT port forwarding rules using PowerShell. Suppose you want to redirect all HTTPS traffic that your Hyper-V host receives to the IP address of the virtual machine running on the host. To do this, use the Hyper-V StaticMapping commands.
Create a Hyper-V virtual switch:
New-VMSwitch -SwitchName NAT_Switch -SwitchType Internal

Set the IP address for the new virtual switch:
New-NetIPAddress -IPAddress 192.168.100.1 -PrefixLength 24 -InterfaceAlias "vEthernet (NAT_Switch)"
Enable NAT for this network:
New-NetNat -Name NATNetwork -InternalIPInterfaceAddressPrefix 192.168.100.0/24
Connect the VM to your NAT_Switch and assign it a static IP address (for example, 192.168.10.80). Set the Hyper-V virtual switch IP address (192.168.100.1 in this case) as the default gateway for the virtual machine’s network connection.
You can now enable port forwarding from the Hyper-V host to the virtual machine:
Add-NetNatStaticMapping -NatName NATNetwork443 -Protocol TCP -ExternalIPAddress 0.0.0.0/24 -ExternalPort 443 -InternalIPAddress 192.168.10.80 -InternalPort 443
After executing these PowerShell commands, all HTTPS traffic that comes to the TCP/443 port of the Hyper-V host will be forwarded to the private IP address of the virtual machine.
If you want to create a port forwarding rule for a non-standard port, don’t forget to open it in Windows Firewall:
New-NetFirewallRule -DisplayName "HyperV_Nat_444" -Direction Inbound -LocalPort 444 -Protocol TCP -Action Allow -Enabled True
You can display a complete list of NAT/PAT port forwarding rules on a Hyper-V host like this:
Get-NetNat
34 comments
[…] In Microsoft Windows, starting from Windows XP, there is a built-in ability to set up network ports forwarding (port forwarding). Due to it, any connection […]
Man you saved my life! I have spent literally weeks for several sites that we host, trying everything. Looks like Windows Server 2016 isn’t best suited for hosting files outside .asp file domain (Node.js for example).
Hi, this is a good article.
I would like to ask if there is any mechanism to not only forward but also to copy data? For example, my server listen to TCP port 8845 and will do something when data comes in. I want to keep the original structure but in addition, to copy all coming data and then forward to another server via TCP port 8844. I know to write some codes can do it, but is there any built-in function in Windows Server 2012 can perform this?
Thank you.
George
Do you mean that some application on server processes some way the incoming network data and sends them over the network to another host or modified data is stored locally?
My scenario is: I have a server A to listen TCP 8845 port. There is a program installed in server A to process data when it detects data comes in. What I want to do is to keep the structure in server A, but make a copy to the original incoming data and then send it to server B using TCP 8844 port from server A.
I know we can just write a program to do it, but I want to know if there is any built-in functions in Windows Server 2012 can fulfill my demands.
Thanks.
You have to use rewrites. The easiest way I could do this was to set up an IIS server, download and install ARR, then configure AAR and “URL Rewrite” in the IIS Manager. Took about a day for a software engineer (sys admin novice) to do it and get everything straightened out.
Great write up!!! Do you know if connections going through the forwarded ports count towards the Windows 7 client connection limit of 20 concurrent connections? I’m looking to forward some traffic on my network so I can easily run scripts to redirect it if a downtime occurs but I need to know if I’m going to hit an upper limit of concurrent connections. THANKS!
thank you so so so so so much youjust saved me 8 hours of driving back to a computer i forgot
Excellent article.
I would like to isolate all incoming traffic destined for port 80 to say port 8080. But all locally originated traffic for port 80 as it is. Could you please let me know how this is possible (if at all) in WINDOWS server ?
Try to use the following command:
netsh interface portproxy add v4tov4 listenport=80 listenaddress=127.0.0.1 connectport=8080 connectaddress=127.0.0.1
You create a proxy for the LAN IP as the listenaddress and listenport=80 and then set the destination connectaddress=localhost connectport=8080
Then whenever you connect via localhost:80 you will go through to localhost:80 but if you connect externally via the LAN IP port 80 you will be connected to localhost:8080
Hi ,
i don’t understand how to forward the port ( 80 for examble ) to any ip and port .
Use following sintax:
netsh interface portproxy add v4tov4 listenaddress=[your_local_ip_adress] listenport=80 connectaddress=[any_ip_adress] connectport=[any_tcp_port]For example,
netsh interface portproxy add v4tov4 listenaddress=192.168.1.100 listenport=80 connectaddress=192.168.120.120 connectport=8080Thanks for this write-up! Been trying to figure out a particularly problematic issue with a legacy application and hoping maybe this can help.
Can this be used to redirect traffic originating on the local machine and directed to a particular IP address to instead send it to a different IP? For example, I have an application that is hard-coded to seek data in an archive at IP x.x.x.10, but the data has been moved and now resides at x.x.x.20 (and I can’t just re-IP the new archive location to make it x.x.x.10). Any thoughts on how to get the application’s requests, even though coming out of the application addressed to x.x.x.10, to instead be redirected and sent to x.x.x.20? Hope this makes sense…
Thanks for the quick and nice article. The double quotes in the firewall command appear unicode not ascii. My command line shell accepts both but makes the two names different.
THIS IS A GREAT WRITEUP!
However, question:
1) Does this work with IPv6?
2) When I’m connected to my VPN (w/ IPv6 enabled, all the ports that I have opened at my router and Win Firewall are now closed, eventho it says “listening on 0.0.0.0”. So, do I need to forward the ports from 0.0.0.0 to the Local LAN adapter, or from the IP address of the VPN adapter to the local LAN adapter? Kinda confused about this.
Thanks!
Hi, regarding the second question, have you resolved it yet ? If it helps, my setup is a vpn and then trying to redirect to a virtualbox vm. Locally on the host server it works, but incoming traffic from vpn, is not connecting. Any suggestions?
UDP ports are commonly used for VPN traffic. You cannot forward UDP port using
netsh interface portproxy...Is there any effective way to adjust Windows Firewall to whitelist IP addresses to the ports created with portproxy? My WF rules seem to have no effect.
i want to redirect traffic that goes from a local app to a specific remote address and force it to go to a specific port:
i tried something like:
netsh interface portproxy add v4tov4 listenaddress=[remote_address] connectport=[port_i_want_to_forward_to] connectaddress=[remote_address]
can i do something like this?
Very good post !! Thank you
Hi
Could I redirect 80 or 53 to other server?
Ex. My oficial site is hosted in a linux server with the same DNS name at AD server.
If I use primary DNS from AD server on stations, I can’t open my site and applicatons throug DNS hosted on second server.
Thanks
Hi
I did not understand, do you want to forward HTTP connections for internal clients from AD server to Linux?
PS. You can forward this way only TCP connections (DNS work over UDP potocol).
You are a legend. Thanks for the great article worked like a charm!
[…] Windows Port Forwarding Example […]
Thanks . This is very useful.
It worked for me
Excellent article on the topic. We have In The Netherlands static IP addresses so a DNS is not necessary. But with some routers here (KPN Experia box) . you need to port forward on 2 different places within the router and that can be a real challenge.
Hello i cant enter pc remotely with any domain accaunt, when i wanna try show error, “Logon attemp failed, or incorrect user amd password” but username and password are correct
Thanks so much for this amazing article! I got the necessary insight into the way port forwarding works in Windows. I’m used to work with firewalld rules in Linux and now I was faced with a Windows (19 Server) installation… didn’t quite know where to start or what to do. I appreciate it.
Do you know if the client’s original source IP/port is maintained when portproxy is used?
Many proxies I’ve worked with in the past will source-NAT the traffic so that the return path is maintained, but this can play havoc with fail2ban-type systems that block IPs on failed authentications (because the receiving service sees the proxy as the client, and so blocks the proxy IP, effectively blocking all future connections).
Was wondering if proxyport suffered from this (and, if so, what IP/port does it translate source to)?
[…] Windows Port Forwarding Example […]
you save my live !
Hi,
thank you for your article.
I’ve a new situation. usually I used this logic to redirect connections from my internal LAN to my website (running outside) that is the same as my internal domain, as example here, test.com
So, my AD domain is: test.com.
My local AD IP Address is: 10.0.0.10
My website running outside are running under the ip, as example, 200.200.200.200
Because in the LAN, if someone pings test.com, the return is not 200.200.200.200 but 10.0.0.10, as that is the IP Address of the Domain Controller.
So, usually I used this rule to redirect the requests:
netsh interface portproxy add v4tov4 listenport=80 listenaddress=10.0.0.10 connectport=80 connectaddress=200.200.200.200
netsh interface portproxy add v4tov4 listenport=443 listenaddress=10.0.0.10 connectport=443 connectaddress=200.200.200.200
For some reason, in 2 different networks, with 2 different domains, this rule is not working anymore.
Also, I did this but this, not working:
New-NetFireWallRule -DisplayName ‘Redirect 80-443′ -Direction Outbound -LocalPort @(’80’,’443′) -Action Allow -Protocol TCP
New-NetFireWallRule -DisplayName ‘Redirect 80-443′ -Direction Inbound -LocalPort @(’80’,’443′) -Action Allow -Protocol TCP
suggestions
Hi
I want to forward pptp port for a vpn with my company public ip.
How to do it ?
Thanks