You can use PowerShell to view or change BIOS/UEFI settings on a Windows computer. In this article, we will look at how to use Windows PowerShell to get or change computer BIOS settings on regular computers and on popular brand devices (HP, Lenovo, Dell, and Toshiba).
Check BIOS/UEFI Version with PowerShell
The WMI class Win32_BIOS provides basic information about the computer’s BIOS (UEFI). You can use the Get-WmiObject cmdlet to get BIOS information from WMI (Windows Management Instrumentation).
Get-WmiObject -Class Win32_BIOS
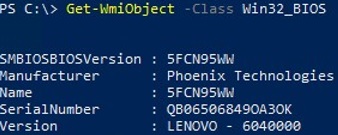
By default, the command returns information about the BIOS version (SMBIOSBIOSVersion), manufacturer, serial number, and computer model.
Get-CimInstance -Class Win32_BIOS
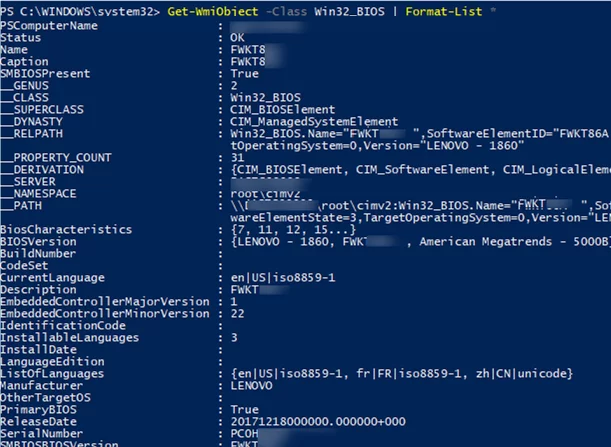
To view the full list of BIOS parameters that are available in the Win32_BIOS WMI class, use the command:
Get-WmiObject -Class Win32_BIOS | Format-List *
You can view only the BIOS settings you are interested in. For example, BIOS version, computer serial number, manufacturer, and release date:
Get-WmiObject -Class Win32_BIOS | Select SMBIOSBIOSVersion, Manufacturer, SerialNumber, ReleaseDate
You can also get BIOS information from a remote computer:
Get-WmiObject -Class Win32_BIOS -ComputerName MUN-WKS41
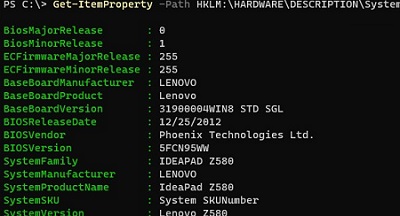
Get-ItemProperty -Path HKLM:\HARDWARE\DESCRIPTION\System\BIOS
The Win32_BIOS is a generic class that can be used to get basic BIOS information on any Windows device. However, some hardware vendors provide special WMI classes to access the BIOS directly from the Windows OS (you will need to install the manufacturer’s native drivers.).
How to Get or Change BIOS Settings with the Get-BIOS Module
You can use a separate module of PSGallery called Get-BIOS to get BIOS/UEFI settings for Dell, HP, Lenovo, and Toshiba computers.
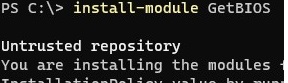
Install the module from the PowerShell online gallery (PowerShell modules can be installed offline):
Install-Module GetBIOS
To view your computer’s BIOS settings, run the command:
Get-BIOS
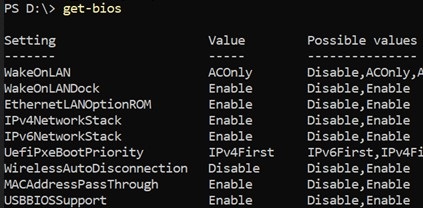
With some versions of the BIOS, you can display not only the current value of the BIOS parameter but also its description and the possible values:
Get-BIOS -ShowDescription
There is also a module from the same developer that allows you to change the BIOS settings on Dell, Lenovo, and HP machines.
Install-Module SetBIOS
You need to create a CSV file in the following format to change your device’s BIOS settings: {Setting, Value}.
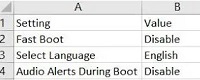
In order to apply a CSV file containing the BIOS settings, run the following command
Set-BIOS -Path "YourBIOSSettingsFile.csv"
-Password to the option.List BIOS Settings on Lenovo Device with PowerShell
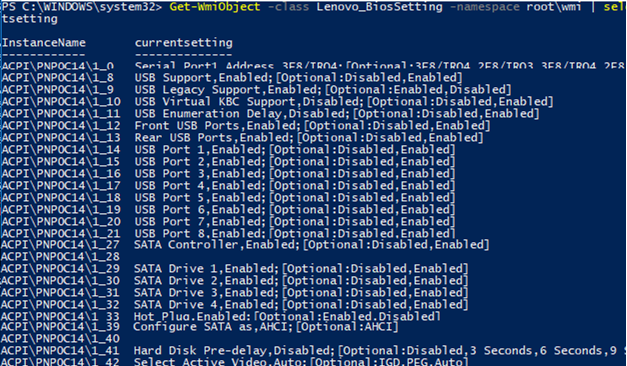
Current BIOS settings are stored in a separate WMI class on Lenovo computers. You can list the available BIOS options and their values on the Lenovo device:
Get-WmiObject -class Lenovo_BiosSetting -namespace root\wmi | select-object InstanceName, currentsetting
Let’s check if the BIOS password is set on your Lenovo computer:
(gwmi -Class Lenovo_BiosPasswordSettings -Namespace root\wmi).PasswordState
If the command returned 0, then the BIOS security password is not set.

Change BIOS admin password on your Lenovo device:
(gwmi -Class Lenovo_SetBiosPassword -Namespace root\wmi).SetBiosPassword("pap,oldPassword,newPassword,ascii,us")
You can change some BIOS parameters on Lenovo computers. For example, let’s enable WOL (Wake-On-LAN):
$getLenovoBIOS = gwmi -class Lenovo_SetBiosSetting -namespace root\wmi
 $getLenovoBIOS.SetBiosSetting("WakeOnLAN,Enable")
 $SaveLenovoBIOS = (gwmi -class Lenovo_SaveBiosSettings -namespace root\wmi)
 $SaveLenovoBIOS.SaveBiosSettings()
Reset your Lenovo device’s BIOS settings to factory defaults:
$DefaultSettings = Get-WmiObject -Namespace root\wmi -Class Lenovo_LoadDefaultSettings
 $DefaultSettings.LoadDefaultSettings("CurrentBIOSPassword,ascii,us")
PowerShell: List and Change BIOS Settings on HP Computers
You can list the available BIOS options, their values, and available options on Hewlett Packard computers/laptops using the following command:
Get-WmiObject -Namespace root/hp/instrumentedBIOS -Class hp_biosEnumeration | select Name, value, possiblevalues –AutoSize
On HP computers, you can use PowerShell to change some BIOS settings. For example, you can disable the ability to boot your computer from a USB storage device.
$getHPBios = gwmi -class hp_biossettinginterface -Namespace "root\hp\instrumentedbios"
 $getHPBios.SetBIOSSetting('USB Storage Boot','Disable')
If a password is required to change BIOS settings on an HP device, you can use this script:
$HPBIOSPassword = "<utf-16/>"+"Passw0rd!1"
 $getHPBios = gwmi -class hp_biossettinginterface -Namespace "root\hp\instrumentedbios"
 $getHPBios.SetBIOSSetting(‘Network (PXE) Boot','Disable',$HPBIOSPassword)
If the last command has returned “0”, it was successfully executed. You can use a simple PowerShell handler:
$ChangeBIOS_State = $bios.setbiossetting(Network (PXE) Boot', 'Disable' , $HPBIOSPassword)
 $ChangeBIOS_State_Code = $ChangeBIOS_State.return
 If(($ChangeBIOS_State_Code) -eq 0)
 {
 write-host "OK"
 }
 Else
 {
 write-host "Error - (Return code $ChangeBIOS_State_Code)" -Foreground Red
 }
If you want to enable the LAN/WLAN Switching in BIOS on an HP laptop to automatically disconnect from Wi-Fi when an Ethernet connection is available, run this command:
$getHPBios.SetBIOSSetting('LAN/WLAN Switching','Enable')
You can also install the HP Client Management Script Library (CMSL) extension on your Hewlett-Packard device (https://www.hp.com/us-en/solutions/client-management-solutions/download.html). CMSL includes several PowerShell modules that allow you to get or change BIOS/UEFU settings, update firmware, etc.
Export the current BIOS settings to a text file:
Get-HPBIOSSettingsList | Out-File -FilePath ‘C:\ProgramData\HP\CMSL\Logs\CurrentBIOSSettings.txt’
Enable the WLAN Auto Switching option in the HP BIOS settings:
Set-HPBIOSSettingValue -Name "LAN/WLAN Auto Switching" -Value Enable -Password BiosPass000rd
Configure DELL BIOS Settings with PowerShell
You can view and manage BIOS settings on DELL computers using the DCIM-BIOSService WMI class or the modern root\dellomci class (available after installing OMCI, Open Manage Client Instrumentation).
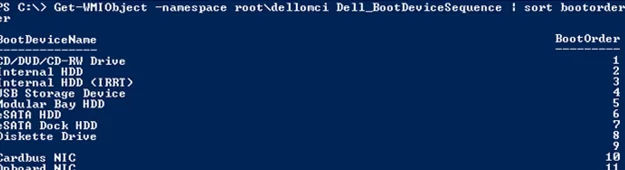
To view the boot device order in BIOS on Dell computers, run the following command:
Get-WmiObject -NameSpace root\dellomci Dell_BootDeviceSequence | sort bootorder | select BootDeviceName, BootOrder
For example, you can enable Wake on LAN in the BIOS like this:
(Get-WmiObject DCIM-BIOSService -namespace rootdcimsysman).SetBIOSAttributes($null,$null,"Wake-On-LAN","4")
In addition, for Dell computers, you can use the official DellBIOSProvider PowerShell module, which is installed as part of the driver installation process, or you can manually install it with the command:
Install-Module -Name DellBIOSProvider -Force
For example, you can use this module to get the boot order on your Dell computer:
Get-Item DellSmbios:\BootSequence\Bootsequence
Check that the BIOS password is set:
Get-Item -Path DellSmbios:\Security\IsAdminPasswordSet
Change BIOS security password on a Dell device:
Set-Item -Path Dellsmbios\Security\AdminPassword –Value BadDellPa$$ –Password G00dDe11P@ss
We had a look at how to use PowerShell to get and change BIOS settings on Windows devices. This allows you to unify the BIOS/UEFI settings on all your computers (using SCCM, Intune, MDT, etc.).
6 comments
Hello,
I need to remotely (using Anydesk software) check and enable Wake-on-lan in the Bios of a Lenovo C50-30 All-in-One Type F0B1.
https://pcsupport.lenovo.com/gb/en/products/desktops-and-all-in-ones/lenovo-c-series-all-in-ones/lenovo-c50-30-all-in-one/f0b1/f0b1003muk/s1006b81?linkTrack=Caps%3ABody_SearchProduct&searchType=6&keyWordSearch=S1006B81
Running windows 8.1
Please can you confirm the Lenovo powershell commands above will work on the Lenovo C50-30 All-in-One Type F0B1.
To avoid any command type errors driving me mad, can you please give me the exact powershell command:
to check the current bios Wake-on-lan settings, and
the exact powershell command to enable the bios Wake-on-lan settings.
This will be most helpful, Thank you
shammi
Great. Thx very much.
do not assume you must include the password in the parameters of the cmdlet, especially on consumer laptops, consumer desktops from HP. I put a password on my HP Spectre BIOS/UEFI and set my boot order to disable booting from USB. Then I ran the Powershell cmdlet to enable booting from USB, and it bypassed the password and changed the setting. I hope that is not the case in their business laptops.
I want to know a AD user’s last login details including computer name, date,time etc.
SSRAWATI, your question has nothing to do with topic of this article. You’re best bet is to find an answer on Stack Overflow, Google, etc.
Hi,
so we had a powercut the other day and thank goodness our UPS saved the servers, but all the pcs shut down, now some came back on, others were turned on by other users and I turned some on, so is there a way for both Dell and HP computers to query through WMI, if their autostart option is enabled, for Dell it is under power management, AC Recovery. I am not 100% sure what it is for HP, dont have a spare HP I can boot up to have a look at.
Thanks for looking