Windows OS Hub
  • Windows Server
    • Windows Server 2022
    • Windows Server 2019
    • Windows Server 2016
    • Windows Server 2012 R2
    • Windows Server 2008 R2
    • SCCM
  • Active Directory
    • Active Directory Domain Services (AD DS)
    • Group Policies
  • Windows Clients
    • Windows 11
    • Windows 10
    • Windows 8
    • Windows 7
    • Windows XP
    • MS Office
    • Outlook
  • Virtualization
    • VMWare
    • Hyper-V
    • KVM
  • PowerShell
  • Exchange
  • Cloud
    • Azure
    • Microsoft 365
    • Office 365
  • Linux
    • CentOS
    • RHEL
    • Ubuntu
  • Home
  • About

Windows OS Hub

  • Windows Server
    • Windows Server 2022
    • Windows Server 2019
    • Windows Server 2016
    • Windows Server 2012 R2
    • Windows Server 2008 R2
    • SCCM
  • Active Directory
    • Active Directory Domain Services (AD DS)
    • Group Policies
  • Windows Clients
    • Windows 11
    • Windows 10
    • Windows 8
    • Windows 7
    • Windows XP
    • MS Office
    • Outlook
  • Virtualization
    • VMWare
    • Hyper-V
    • KVM
  • PowerShell
  • Exchange
  • Cloud
    • Azure
    • Microsoft 365
    • Office 365
  • Linux
    • CentOS
    • RHEL
    • Ubuntu

 Windows OS Hub / Windows 11 / How to Install Windows 11 on a VMware Virtual Machine

June 8, 2023 VMWareWindows 11

How to Install Windows 11 on a VMware Virtual Machine

This article explains how to install Windows 11 as a guest OS in a virtual machine running on VMware Workstation or VMware ESXi hypervisors. When trying to install Windows 11 on a VMware virtual machine, most users see an error message stating that Windows 11 cannot run on this computer. Let’s try to explain why this message appears and how to bypass it.

Contents:
  • How to Bypass TPM and Secure Boot when Installing Windows 11 to a VMware VM?
  • Installing Windows 11 on VMware Workstation
  • How to Install Windows 11 on VMware ESXi/vSphere?

Microsoft published a set of minimum system requirements to install Windows 11:

  • 4 GB RAM
  • 1 GHz dual-core CPU
  • TPM 2.0 (Trusted Platform Module) chip

If your computer or the virtual machine doesn’t meet the requirements, the following error appears when you try to install Windows 11 from an ISO image:

This PC can’t run Windows 11. This PC doesn’t meet the minimum system requirements to install this version of Windows. For more information, visit aka.ms/WindowsSysReq </pre

This PC can’t run Windows 11. This PC doesn’t meet the minimum system requirements to install this version of Windows

How to Bypass TPM and Secure Boot when Installing Windows 11 to a VMware VM?

You can skip the system requirements check when installing Windows 11 on a virtual machine. You can bypass the minimum requirements checks for memory, compatible CPU, TPM chip, and UEFI+Secure Boot.

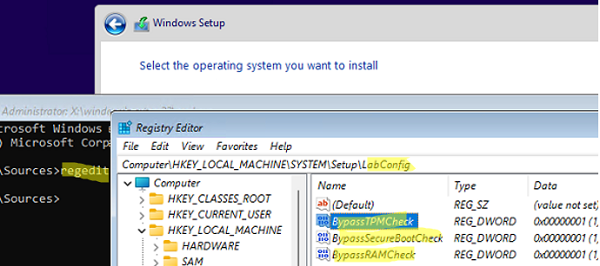
  1. To do it, run a normal Windows 11 installation on a VMware virtual machine. After the installation error appears (see the screenshot above), go one step back (click an arrow in Windows Setup window);
  2. Press Shift + F10 to open the command prompt;
  3. Enter regedit.exe to open the Registry Editor;
  4. Go to the reg key HKEY_LOCAL_MACHINE\SYSTEM\Setup and create a new registry key named LabConfig;
  5. Create three DWORD (32-bit) parameters with values of 1 in the LanConfig reg key:
    BypassTPMCheck
    BypassSecureBootCheck
    BypassRAMCheckwindows 11 labconfig keys - skip checks: BypassTPMCheck and BypassSecureBootCheck
  6. Close the Registry Editor and the command prompt and get back to Windows 11 setup screen;
  7. Select Windows 11 edition and click Install;
  8. You should now be able to continue installing Windows 11 without checking the minimum system requirements and the TPM device.

Installing Windows 11 on VMware Workstation

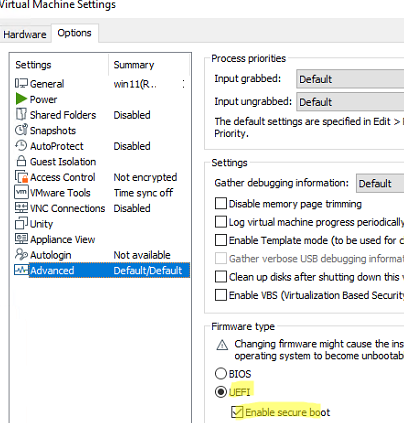
To install Windows 11 in a native mode (meeting all system requirements) on VMware Workstation, create a virtual machine with UEFI support, Secure Boot and a virtual TPM chip.

Open virtual machine settings, go to the Advanced tab and make sure that UEFI firmware is used for the VM. Also check the Enable secure boot option.

VMware Workstation - create Windows 11 VM with UEFI and Secuce Boot enabled

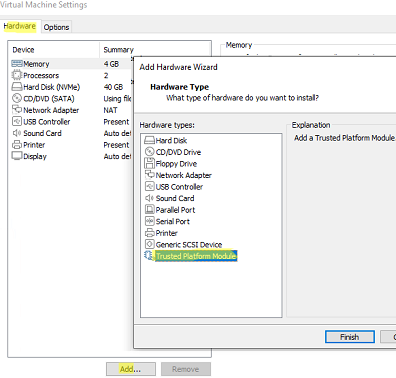
Then add a virtual TPM module (vTPM) to the VM. Before doing it, encrypt the VMware Workstation virtual machine.

Go to Access Control in the Options section and click Encrypt. Set the encryption password. The encryption takes some time.

encrypt VM on VMware workstation

Then open the Hardware tab, click Add and add the Trusted Platform Module.

vmware workstation add virtual Trusted Platform Module

Then you can install Windows 11 on this virtual machine as usual.

How to Install Windows 11 on VMware ESXi/vSphere?

To install Windows 11 to a VMware ESXi virtual machine in vSphere, add the Virtual Trusted Platform Module to the VM. Before doing it, you will have to configure the Key Management Server (key provider) to manage encryption keys.

In vSphere 7.0 and newer, vCenter supports a built-in Key Provider, so you don’t need using an external KMS. To enable the built-in Key Provider in vCenter:

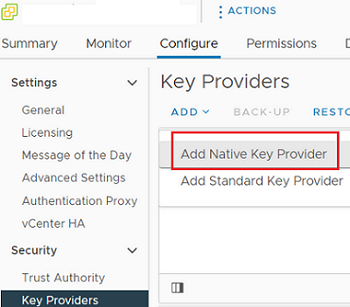
  1. Select your vCenter and open Configure -> Security -> Key Provider;
  2. Click Add -> Add Native Key Provider;
    Add Native Key Provider in vmware vCenter 7.0
  3. Enter the provider name and uncheck the option Use key provider only with TPM protected ESXi hosts. It allows using vTPM for hosts without a physical TPM chip;
  4. Then back up the Key Provider. Click BACK-UP and download the .p12 file. Save it to a secure location.

To enable vTPM for a VMware ESXi virtual machine, it must meet the following requirements:

  • vSphere 6.7 or newer (you will not be able to use free VMware Hypervisor)
  • VM Hardware 14 (ESXi 6.7) or higher
  • EFI and Secure Boot
  • VM encryption
  • Windows Virtualization Based Security option must be enabled in the VM settings

Make sure that all VM options are enabled and you can encrypt the disk of your VM.

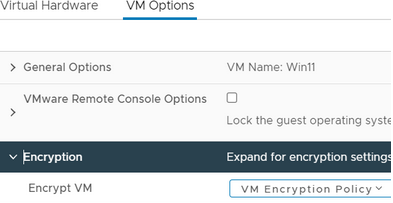
To encrypt an existing VM, open the VM Options tab and enable disk encryption in the Encryption section.

VMware Esxi VM - encryption settings

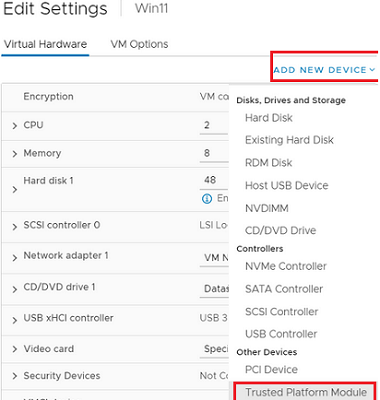
Then you can add the TPM in the Virtual Hardware tab (Add New Device -> Trusted Platform Module) and run normal Windows 11 installation on the VM.

add trusted platform module to a VMware VM on ESXi

See an example of how to install Windows 11 to a Hyper-V virtual machine here.

1 comment
2
Facebook Twitter Google + Pinterest
previous post
Configuring KMS License Server for Office 2021/2019/2016 Volume Activation
next post
Windows Cannot Find the Microsoft Software License Terms

Related Reading

Reset Root Password in VMware ESXi

October 12, 2023

Installing Language Pack in Windows 10/11 with PowerShell

September 15, 2023

How to View and Change BIOS (UEFI) Settings...

September 13, 2023

How to Create UEFI Bootable USB Drive to...

September 11, 2023

Managing Windows Firewall Rules with PowerShell

August 31, 2023

1 comment

Omar August 26, 2022 - 6:31 pm

Thank you very much

Reply

Leave a Comment Cancel Reply

Categories

  • Active Directory
  • Group Policies
  • Exchange Server
  • Microsoft 365
  • Azure
  • Windows 11
  • Windows 10
  • Windows Server 2022
  • Windows Server 2019
  • Windows Server 2016
  • PowerShell
  • VMWare
  • Hyper-V
  • Linux
  • MS Office

Recent Posts

  • Zabbix: How to Get Data from PowerShell Scripts

    October 27, 2023
  • Tracking Printer Usage with Windows Event Viewer Logs

    October 19, 2023
  • PowerShell: Configure Certificate-Based Authentication for Exchange Online (Azure)

    October 15, 2023
  • Reset Root Password in VMware ESXi

    October 12, 2023
  • How to Query and Change Teams User Presence Status with PowerShell

    October 8, 2023
  • How to Increase Size of Disk Partition in Ubuntu

    October 5, 2023
  • How to Use Ansible to Manage Windows Machines

    September 25, 2023
  • Installing Language Pack in Windows 10/11 with PowerShell

    September 15, 2023
  • Configure Email Forwarding for Mailbox on Exchange Server/Microsoft 365

    September 14, 2023
  • How to View and Change BIOS (UEFI) Settings with PowerShell

    September 13, 2023

Follow us

  • Facebook
  • Twitter
  • Telegram
Popular Posts
  • Adding Drivers into VMWare ESXi Installation Image
  • How to Fix ‘An Operating System Wasn’t Found’ Error on Windows
  • Shrinking VMDK Virtual Disk Size on VMWare ESXi
  • How to Access VMFS Datastore from Linux, Windows, or ESXi
  • Recovering a Deleted VMFS Datastore on VMware ESXi/vSphere
  • Updating Windows VM Templates on VMWare with PowerShell
  • Using iPerf to Test Network Speed and Bandwidth
Footer Logo

@2014 - 2023 - Windows OS Hub. All about operating systems for sysadmins


Back To Top